[MLOps] kubeflow 설정
업데이트:
kubeflow 설정
1. kubeflow 기본 사용법
웹브라우저를 하나 열고 마스터 서버 IP와 포트 31380을 적어주세요. 예를 들어 마스터 서버 IP가 111.11.1.111 이라고하면 아래와 같이 적어주면 됩니다.
111.11.1.111:31380
그러고 몇 초 기다리면 아래와 같은 화면이 나옵니다.
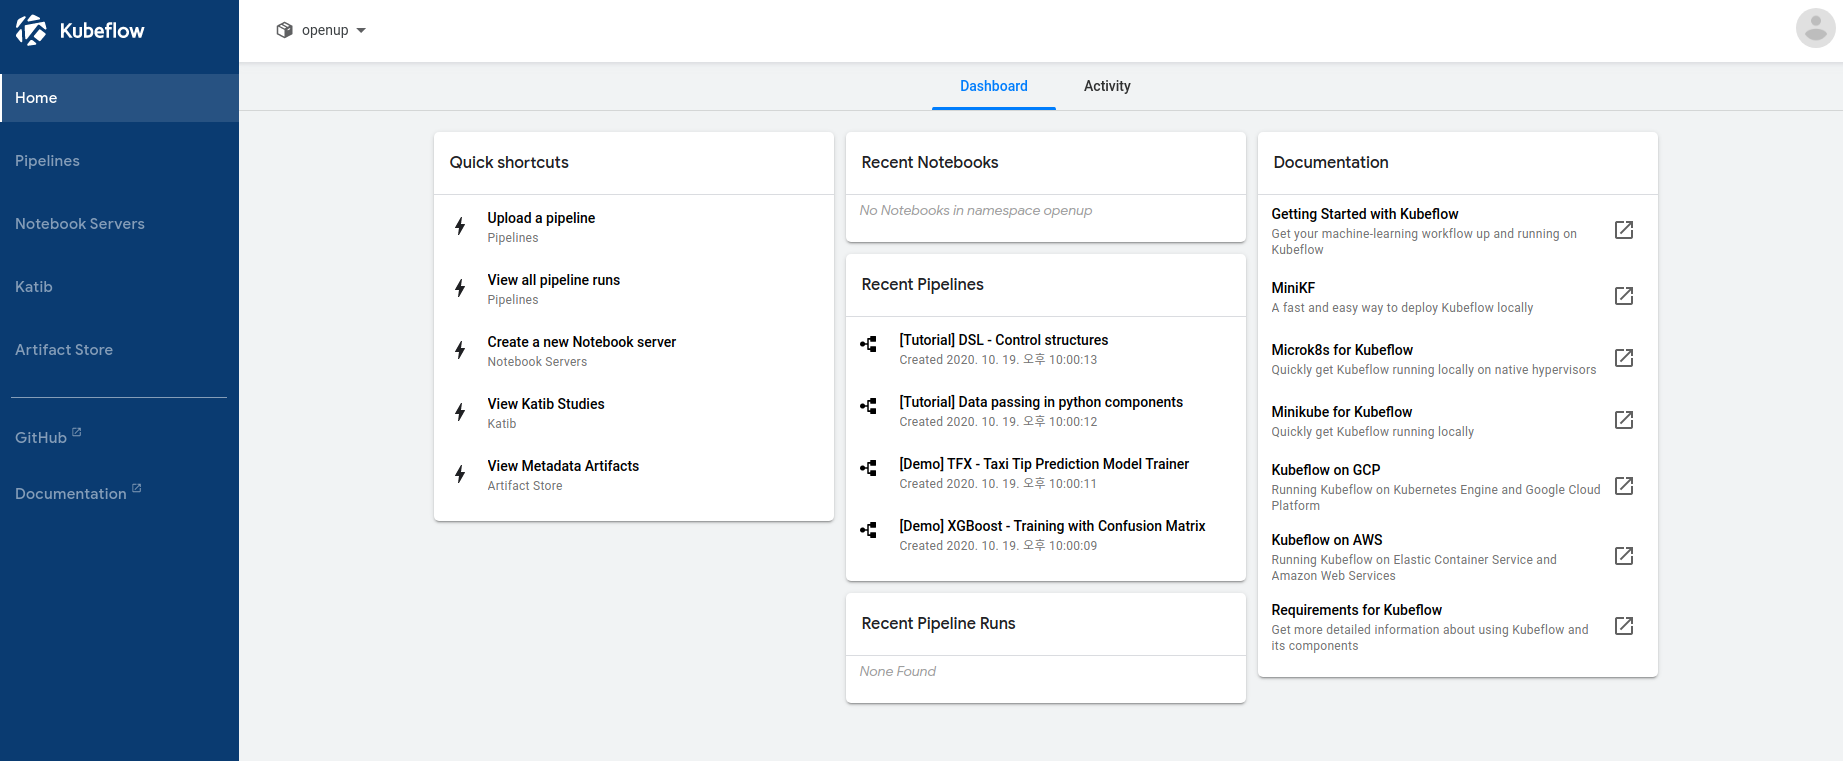
위 화면에서 왼쪽 메뉴에 Notebook server를 누르면 현재 만들어진 주피터 노트북서버를 볼 수 있으며, 머신러닝을 위한 주피터 노트북 서버를 만들 수 있습니다.

위 화면에서 +New server를 누르면 새로운 주피터 노트북 서버를 만들 수 있습니다.
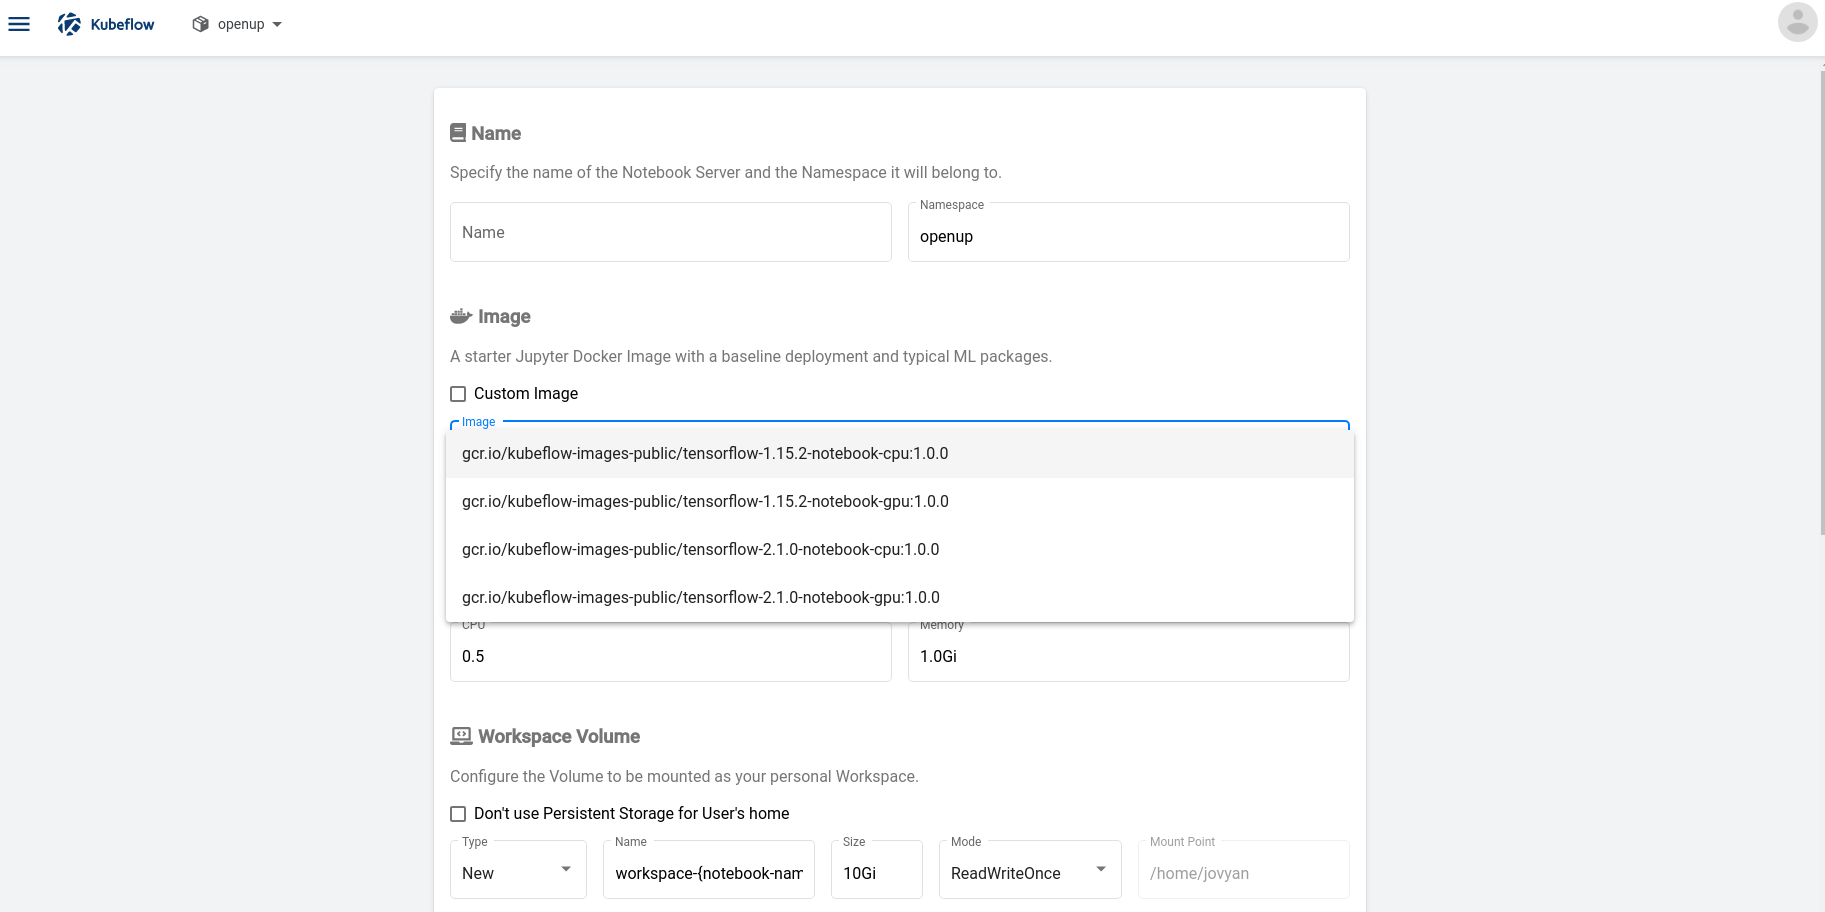
위와 같이 여러 설정 사항을 정하고 Launch를 누르면 만들어집니다. 그리고 서버 목록에서 connect를 누르면
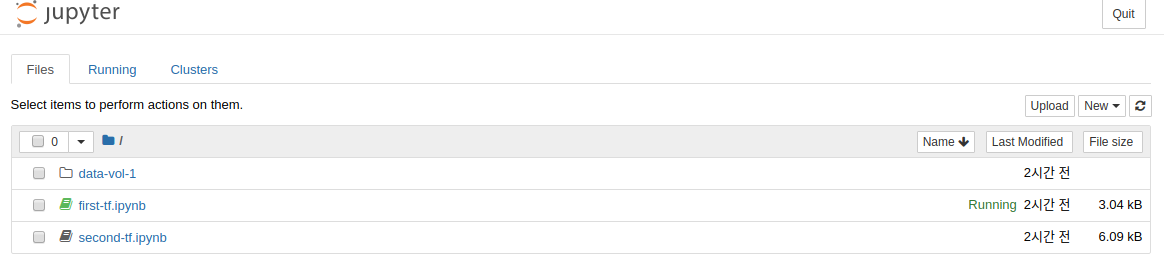
위와 같이 주피터 노트북을 사용할 수 있습니다.
2. kubeflow에 텐서플로 이미지 올리기
아래 버전중 자신이 원하는 이미지를 올리세요.
2.1 kubeflow-jupyterlab:pytorch1.6-cpu
$ mkdir -p docker_image/jupyterlab/pytorch-cpu
$ vim docker_image/jupyterlab/pytorch-cpu/Dockerfile
FROM python:3.6

WORKDIR /home/jovyan

USER root

RUN pip install jupyter -U && pip install jupyterlab

ENV DEBIAN_FRONTEND=noninteractive

RUN apt-get update && apt-get install -yq --no-install-recommends \
  apt-transport-https \
  build-essential \
  bzip2 \
  ca-certificates \
  curl \
  g++ \
  git \
  gnupg \
  graphviz \
  locales \
  lsb-release \
  openssh-client \
  sudo \
  unzip \
  vim \
  wget \
  zip \
  emacs \
  python3-pip \
  python3-dev \
  python3-setuptools \
  libgl1-mesa-glx \
  python3-opencv \
  cmake \
  ninja-build \
  && apt-get clean && \
  rm -rf /var/lib/apt/lists/*

RUN curl -s https://packages.cloud.google.com/apt/doc/apt-key.gpg | sudo apt-key add -
RUN echo "deb https://apt.kubernetes.io/ kubernetes-xenial main" | sudo tee -a /etc/apt/sources.list.d/kubernetes.list
RUN apt-get update
RUN apt-get install -y kubectl

RUN pip install msrestazure
RUN pip install cloudpickle
RUN pip install kubeflow-fairing==0.7.2
RUN pip install kfp==0.5  --use-feature=2020-resolver
RUN pip install kfserving==0.2.2.1
RUN pip install kubeflow-kale
RUN pip install dill

RUN pip install tensorboard
RUN pip install torch==1.6 torchvision==0.7 -f https://download.pytorch.org/whl/cu101/torch_stable.html

RUN pip install opencv-python

RUN pip install jupyterlab && \
    jupyter serverextension enable --py jupyterlab --sys-prefix

ARG NB_USER=jovyan

EXPOSE 8888

ENV NB_USER $NB_USER
ENV NB_UID=1000
ENV HOME /home/$NB_USER
ENV NB_PREFIX /

CMD ["sh", "-c", "jupyter lab --notebook-dir=/home/jovyan --ip=0.0.0.0 --no-browser --allow-root --port=8888 --LabApp.token='' --LabApp.password='' --LabApp.allow_origin='*' --LabApp.base_url=${NB_PREFIX}"]
2.2 kubeflow-jupyterlab:tf2.3-cpu
$ mkdir -p docker_image/jupyterlab/tf-cpu
$ nano docker_image/jupyterlab/tf-cpu/Dockerfile
FROM python:3.6

WORKDIR /home/jovyan

USER root

RUN pip install jupyter -U && pip install jupyterlab

ENV DEBIAN_FRONTEND=noninteractive

RUN apt-get update && apt-get install -yq --no-install-recommends \
  apt-transport-https \
  build-essential \
  bzip2 \
  ca-certificates \
  curl \
  g++ \
  git \
  gnupg \
  graphviz \
  locales \
  lsb-release \
  openssh-client \
  sudo \
  unzip \
  vim \
  wget \
  zip \
  emacs \
  python3-pip \
  python3-dev \
  python3-setuptools \
  libgl1-mesa-glx \
  python3-opencv \
  cmake \
  ninja-build \
  && apt-get clean && \
  rm -rf /var/lib/apt/lists/*

RUN curl -s https://packages.cloud.google.com/apt/doc/apt-key.gpg | sudo apt-key add -
RUN echo "deb https://apt.kubernetes.io/ kubernetes-xenial main" | sudo tee -a /etc/apt/sources.list.d/kubernetes.list
RUN apt-get update
RUN apt-get install -y kubectl

RUN pip install msrestazure
RUN pip install cloudpickle
RUN pip install kubeflow-fairing==0.7.2
RUN pip install kfp==0.5  --use-feature=2020-resolver
RUN pip install kfserving==0.2.2.1
RUN pip install kubeflow-kale
RUN pip install dill

RUN pip install tensorboard
RUN pip install tensorflow-cpu==2.3.0
RUN pip install opencv-python

RUN pip install jupyterlab && \
    jupyter serverextension enable --py jupyterlab --sys-prefix

ARG NB_USER=jovyan

EXPOSE 8888

ENV NB_USER $NB_USER
ENV NB_UID=1000
ENV HOME /home/$NB_USER
ENV NB_PREFIX /

CMD ["sh", "-c", "jupyter lab --notebook-dir=/home/jovyan --ip=0.0.0.0 --no-browser --allow-root --port=8888 --LabApp.token='' --LabApp.password='' --LabApp.allow_origin='*' --LabApp.base_url=${NB_PREFIX}"]
2.3 cuda-python:10.1-3.6
$ mkdir -p docker_image/cuda-python
$ nano docker_image/cuda-python/Dockerfile
FROM nvidia/cuda:10.1-cudnn7-devel

RUN apt-get update && apt-get install -y --no-install-recommends ca-certificates curl netbase wget && rm -rf /var/lib/apt/lists/*

RUN set -ex; if ! command -v gpg > /dev/null; then apt-get update; apt-get install -y --no-install-recommends gnupg dirmngr; rm -rf /var/lib/apt/lists/*; fi

RUN apt-get update && apt-get install -y --no-install-recommends git mercurial openssh-client subversion procps && rm -rf /var/lib/apt/lists/*

RUN set -ex; apt-get update; DEBIAN_FRONTEND=noninteractive apt-get install -y --no-install-recommends autoconf automake bzip2 dpkg-dev file g++ gcc imagemagick libbz2-dev libc6-dev libcurl4-openssl-dev libdb-dev libevent-dev libffi-dev libgdbm-dev libglib2.0-dev libgmp-dev libjpeg-dev libkrb5-dev liblzma-dev libmagickcore-dev libmagickwand-dev libmaxminddb-dev libncurses5-dev libncursesw5-dev libpng-dev libpq-dev libreadline-dev libsqlite3-dev libssl-dev libtool libwebp-dev libxml2-dev libxslt-dev libyaml-dev make patch unzip xz-utils zlib1g-dev $(if apt-cache show 'default-libmysqlclient-dev' 2>/dev/null | grep -q '^Version:'; then echo 'default-libmysqlclient-dev'; else echo 'libmysqlclient-dev'; fi); rm -rf /var/lib/apt/lists/*

ENV PATH=/usr/local/bin:/usr/local/sbin:/usr/local/bin:/usr/sbin:/usr/bin:/sbin:/bin

ENV LANG=C.UTF-8

ENV GPG_KEY=0D96DF4D4110E5C43FBFB17F2D347EA6AA65421D

ENV PYTHON_VERSION=3.6.12

ENV PYTHON_GET_PIP_URL=https://github.com/pypa/get-pip/raw/5578af97f8b2b466f4cdbebe18a3ba2d48ad1434/get-pip.py

ENV PYTHON_GET_PIP_SHA256=d4d62a0850fe0c2e6325b2cc20d818c580563de5a2038f917e3cb0e25280b4d1

RUN set -ex; wget -O get-pip.py "$PYTHON_GET_PIP_URL"; echo "$PYTHON_GET_PIP_SHA256 *get-pip.py" | sha256sum --check --strict -; python get-pip.py               --disable-pip-version-check             --no-cache-dir          "pip==$PYTHON_PIP_VERSION"      ;       pip --version;          find /usr/local -depth          \(                      \( -type d -a \( -name test -o -name tests -o -name idle_test \) \)                     -o                      \( -type f -a \( -name '*.pyc' -o -name '*.pyo' \) \)           \) -exec rm -rf '{}' +;         rm -f get-pip.py
2.3 kubeflow-jupyterlab:pytorch1.6-gpu
$ mkdir -p docker_image/jupyterlab/pytorch-cpu
$ nano docker_image/jupyterlab/pytorch-cpu/Dockerfile
FROM cuda-python:10.1-3.6

WORKDIR /home/jovyan

USER root

RUN pip install jupyter -U && pip install jupyterlab

ENV DEBIAN_FRONTEND=noninteractive

RUN apt-get update && apt-get install -yq --no-install-recommends \
  apt-transport-https \
  build-essential \
  bzip2 \
  ca-certificates \
  curl \
  g++ \
  git \
  gnupg \
  graphviz \
  locales \
  lsb-release \
  openssh-client \
  sudo \
  unzip \
  vim \
  wget \
  zip \
  emacs \
  python3-pip \
  python3-dev \
  python3-setuptools \
  libgl1-mesa-glx \
  python3-opencv \
  cmake \
  ninja-build \
  && apt-get clean && \
  rm -rf /var/lib/apt/lists/*

RUN curl -s https://packages.cloud.google.com/apt/doc/apt-key.gpg | sudo apt-key add -
RUN echo "deb https://apt.kubernetes.io/ kubernetes-xenial main" | sudo tee -a /etc/apt/sources.list.d/kubernetes.list
RUN apt-get update
RUN apt-get install -y kubectl

RUN pip install msrestazure
RUN pip install cloudpickle
RUN pip install kubeflow-fairing==0.7.2
RUN pip install kfp==0.5  --use-feature=2020-resolver
RUN pip install kfserving==0.2.2.1
RUN pip install kubeflow-kale
RUN pip install dill

RUN pip install tensorboard
RUN pip install torch==1.6 torchvision==0.7 -f https://download.pytorch.org/whl/cu101/torch_stable.html

RUN pip install opencv-python

RUN pip install jupyterlab && \
    jupyter serverextension enable --py jupyterlab --sys-prefix

ARG NB_USER=jovyan

EXPOSE 8888

ENV NB_USER $NB_USER
ENV NB_UID=1000
ENV HOME /home/$NB_USER
ENV NB_PREFIX /

CMD ["sh", "-c", "jupyter lab --notebook-dir=/home/jovyan --ip=0.0.0.0 --no-browser --allow-root --port=8888 --LabApp.token='' --LabApp.password='' --LabApp.allow_origin='*' --LabApp.base_url=${NB_PREFIX}"]
3. docker build
아래 두가지 중에 자신의 버전에 맞는 것을 실행하세요(둘다 실행하면 안되고 하나만 실행하세요)
3.1 파이토치
$ sudo docker build -t kubeflow-jupyterlab:pytorch1.6-cpu docker_image/jupyterlab/pytorch-cpu
3.2 텐서플로
$ sudo docker build -t kubeflow-jupyterlab:tf2.3-cpu docker_image/jupyterlab/tf-cpu
4. image tag
아래 두가지 중에 자신의 버전에 맞는 것을 실행하세요.(둘다 실행하면 안되고 하나만 실행하세요.)
4.1 파이토치
$ sudo docker tag kubeflow-jupyterlab:pytorch1.6-cpu kubeflow-registry.default.svc.cluster.local:30000/kubeflow-jupyterlab:pytorch1.6-cpu
4.2 텐서플로
$ sudo docker tag kubeflow-jupyterlab:tf2.3-cpu kubeflow-registry.default.svc.cluster.local:30000/kubeflow-jupyterlab:tf2.3-cpu
5. image push
아래 두가지 중에 자신의 버전에 맞는 것을 실행하세요.(둘다 실행하면 안되고 하나만 실행하세요.)
5.1 파이토치
$ sudo docker push kubeflow-registry.default.svc.cluster.local:30000/kubeflow-jupyterlab:pytorch1.6-cpu
5.2 텐서플로
$ sudo docker push kubeflow-registry.default.svc.cluster.local:30000/kubeflow-jupyterlab:tf2.3-cpu
6. katib
apiVersion: rbac.authorization.k8s.io/v1beta1
kind: Role
metadata:
  name: access-kubeflow
  namespace: kubeflow
rules:
- apiGroups: ["", "kubeflow.org"]
  resources: ["pods", "pods/log", "experiments", "persistentvolumeclaims"]
  verbs: ["create", "delete", "update", "patch", "get", "list", "watch"]
---
apiVersion: rbac.authorization.k8s.io/v1
kind: RoleBinding
metadata:
  name: kubeflow-access-role
  namespace: kubeflow
roleRef:
  apiGroup: rbac.authorization.k8s.io
  kind: Role
  name: access-kubeflow
subjects:
- kind: ServiceAccount
  name: default-editor
  namespace: 본인네임스페이스
metal lb setting
MetalLB deployment
Deploy MetalLB:
-
Apply the manifest:
kubectl apply -f https://raw.githubusercontent.com/google/metallb/v0.8.1/manifests/metallb.yaml -
Allocate a pool of addresses on your local network for MetalLB to use. You need at least one address for the Istio Gateway. This example assumes addresses 10.0.0.100-10.0.0.110. You must modify these addresses based on your environment.
 cat <<EOF | kubectl apply -f -
 apiVersion: v1
 kind: ConfigMap
 metadata:
   namespace: metallb-system
   name: config
 data:
   config: |
     address-pools:
     - name: default
       protocol: layer2
       addresses:
       - 10.0.0.100-10.0.0.110
 EOF
Ensure that MetalLB works as expected (optional):
-
Create a dummy service:
kubectl create service loadbalancer nginx --tcp=80:80 -
Ensure that MetalLB has allocated an IP address for the service:
kubectl describe service nginx -
Check the corresponding MetalLB logs:
kubectl logs -n metallb-system -l component=controller -
Create a pod that will be exposed with the service:
kubectl run nginx --image nginx --restart=Never -l app=nginx -
Ensure that MetalLB has assigned a node to announce the allocated IP address:
kubectl describe service nginx -
Check the corresponding MetalLB logs:
kubectl logs -n metallb-system -l component=speaker -
Check that MetalLB responds to ARP requests for the allocated IP address:
arping -I eth0 10.0.0.101 -
Check the corresponding MetalLB logs:
kubectl logs -n metallb-system -l component=speaker -
Verify that everything works as expected:
curl http://10.0.0.101 -
Clean up:
kubectl delete service nginx
kubectl delete pod nginx
To expose Kubeflow with a LoadBalancer Service, just change the type of the istio-ingressgateway Service to LoadBalancer.
kubectl patch service -n istio-system istio-ingressgateway -p '{"spec": {"type": "LoadBalancer"}}'
After that, get the LoadBalancer’s IP or Hostname from its status and create the necessary certificate.
Create the Certificate with cert-manager:
After applying the above Certificate, cert-manager will generate the TLS certificate inside the istio-ingressgateway-certs secrets. The istio-ingressgateway-certs secret is mounted on the istio-ingressgateway deployment and used to serve HTTPS.
Navigate to https://<LoadBalancer Address>/ and start using Kubeflow.
end to end ml project
web-ui
kubectl port-forward -n istio-system svc/istio-ingressgateway 8080:80
sudo docker run -p 19000:5000 brightfly/fmnist-webui-deploy:latest
호스트ip:19000?model=kfserving-fmnist&name=kfserving-fmnist.kubeflow.example.com&addr=10.0.0.100